Switching from Squarespace to WordPress might seem like a big task, but don’t worry—it’s completely manageable with a step-by-step approach. If you’re ready to switch, this guide will help you understand how to move your website content from Squarespace to WordPress quickly and efficiently. Let’s get started!
Understanding the Basics
Why Switch?
People often switch from Squarespace to WordPress for more flexibility and control. WordPress allows for deeper customization and offers a broader variety of plugins and themes.
What You Need to Know:
- WordPress: A popular platform for building and managing websites, known for its flexibility and power.
- Squarespace: Simpler and more straightforward, great for beginners, but may lack some advanced customization options.
Step 1: Set Up Your Basic WordPress Site
Get a Domain and Hosting: You might already have a domain from Squarespace. You can transfer this domain to a new host or continue using it while hosting your new site elsewhere. Many reliable hosting services exist, such as Bluehost, SiteGround, and DreamHost.
Install WordPress: Most hosting providers offer a simple one-click installation for WordPress. Once you’ve set up your hosting account, follow the provider’s instructions to install WordPress.
Step 2: Export Content from Squarespace
Prepare Your Squarespace Content for Export: Before transferring your content, ensure everything is as you want it on Squarespace. This includes pages, blog posts, and media files.
Export Your Data: Squarespace allows you to export your site’s content to an XML file. On your Squarespace dashboard, navigate to Settings, then Advanced, and select ‘Export.’

Then, navigate to your site’s backend, go to Settings, and click on Import & Export Content.

On the next page, click Export. Then, select WordPress in the pop-up window.

You’ll then have to wait a little while until the process is complete:

Once you see a notification that your export is ready, select the Download button. Save the file – which should be called something like Squarespace-Wordpress-Export-Date.xml – to your computer.
Step 3: Import Content into WordPress
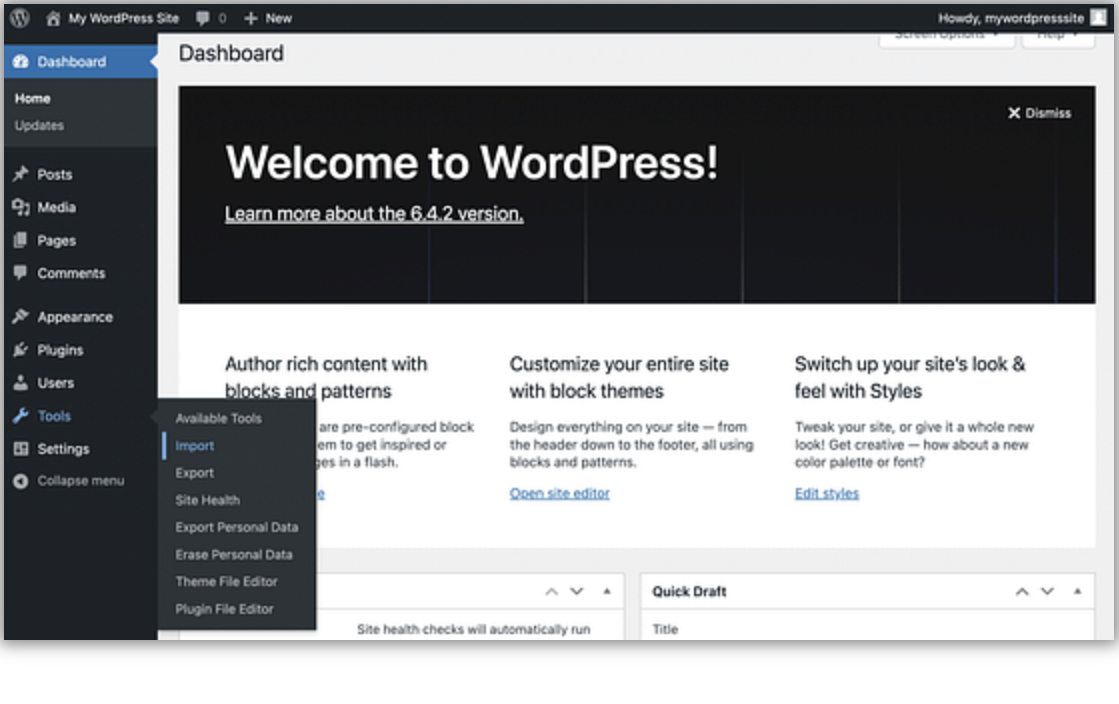
Importing the Exported File: Log into your WordPress site, go to ‘Tools,’ then ‘Import.’

On the following page, scroll to the WordPress section and click Install Now. This installs the importer for you. After a moment, you should see a notification at the top of the screen indicating that the installation is finished.

You’ll also see the Run Importer option at the bottom. Select it, and click Choose File on the following screen. Use the WordPress importer to upload the XML file you exported from Squarespace.

After you select the file, click on Upload file and Import.

Note that if you’re importing blog posts, you’ll also see an option to assign them an author. It’s best to assign them to an existing user.
After you’ve made your selections, hit Submit. You should see a success message, and then you’ll be ready for the next step.
Step 4: Set Up Your WordPress Theme and Manually Add Pages
Choose and Customize a Theme: Select a theme from the WordPress theme directory that suits your style or purchase one from a third-party vendor. Then, you can customize it to match your brand by adjusting colors, fonts, and layout via ‘Appearance’ > ‘Customize.’
Manually Add Pages and Audit Your Site: Not all content may transfer perfectly from Squarespace to WordPress. Manually check each page and add any missing content. Ensure all features work correctly and match your brand’s appearance and functionality.
Step 5: Configure WordPress Settings and Add Plugins
Adjust Permalinks: Set your permalinks to ‘Post name’ under ‘Settings’ > ‘Permalinks.’ This setting uses the title of your posts in the URL, which is beneficial for SEO as it makes your URLs readable and improves your site’s search rankings.
Install Necessary Plugins: Plugins extend functionality. Essential plugins might include ones for SEO, security, and backups. Install them through ‘Plugins’ > ‘Add New.’
Step 6: Configure SEO and Security Settings
Set Up SEO: Use an SEO plugin like Yoast SEO to guide you through optimizing your site to improve visibility in search engines.
Enhance Security: Install plugins like Wordfence or Sucuri to protect your site from threats. Follow their setup guides to configure proper security measures.
Step 7: Test Your New Site
Comprehensive Testing: Before going live, thoroughly test your site on various devices to ensure it displays correctly. Check all functionality, including links, forms, and media.
Resolve Any Issues: Address any problems you find during testing. This might involve adjusting settings, re-uploading media, or rewriting content.
Step 8: Point Your Domain to WordPress
Domain Transfer or Update DNS: If you transfer your existing domain from Squarespace to your new host, complete the transfer process through your domain registrar. Alternatively, update the DNS settings to point to your new WordPress hosting.
Step 9: Go Live and Monitor Your Site
Announce Your New WordPress Site: Once everything is set and you’re happy with the site, announce the switch. Use social media, email newsletters, and other channels to inform your audience.
Keep Monitoring: Regularly check your site’s performance and security. Tools like Google Analytics can help you track user engagement and identify areas for improvement.
Conclusion
Switching from Squarespace to WordPress is a significant step toward gaining more control and customization over your website. Following these steps, you can ensure a smooth transition and set yourself up for success with a powerful, flexible website customized to your needs.